Thursday, June 01, 2006

Hockey Tip Of The Week

3 ON 2 SITUATION

3 - 2 Offense

Attack as quickly as possible and set up a 2-1 versus one defender.Puck carrier, try to go to net and force the defender to play you.If defenders have backed in cross and drop or cross and pick.On a straight attack the second attacker skate to the post, on a cross the third attacker skates to the post.

3 - 2 Defensemen

Delay the attack and try to stand up at blue line.Weak side defender take one attacker to the post and strong side defender play the 2-1 and pressure the third man if a trailer pass is made to the middle

Skate Fitting Tips: Getting Past the "Skate-Lore"

Here are some guidelines to help you select new skates.

Please be aware that these are general or "average" statements. They may not apply to everyone.

Boys' feet usually stop growing when the boy reaches age 14 or 15. The rest of the body may grow significantly in height and weight after this, but the feet tend to remain the same size.

Girls' feet will probably not grow after the girl reaches age 13 or 14.

If a skate looks too big for a foot, it probably is.

Shoe widths are different than skate widths. Skates are wider than shoes of the same width classification.
When purchasing skates for a growing child, allow a half-size (about 3/16 in. or 5 mm) for growing room. Generally, this allowance will provide 12 months of skating before it becomes necessary to stretch the boot or buy new skates.

If the fit is correct, the average 10 year-old child will be able to lace up his or her skates securely without assistance.

Fitting Tips

Always match the skate model to the skater's size, ability, and frequency of use.WARNING: Not every skater will benefit from a higher end skate. A boot that is too stiff can significantly hinder a skater's performance by preventing knee bend and proper edge control. Of course, the opposite is also true: larger, more aggressive skaters need a top end boot for proper support and durability.

Hockey skates fit 1 to 1-1/2 sizes smaller than shoes, for both boys' and men's sizing. For example, a size 6 running shoe will correspond to a size 4 1/2 or 5 skate.

Women's skates generally fit 2 sizes smaller than their shoe sizing. For example a women's size 7 1/2 shoe will require about a size 5 1/2 skate.

A skate fits properly only when laced up. When tightened, the laces will draw the foot back into the boot. A skate that feels too small at first can feel fine once it's done up.

On a properly fitting skate, you'll see a nice, even lacing pattern-not less than 2 1/2" from eyelet to eyelet.
A new skate should feel comfortably snug, but without any pressure points. Specific pressure points (for example, ankle bones, small toes) should be stretched ("popped") in-store to relieve local discomfort. Skates stretch a little after break-in, so a wide fitting skate will only get wider over time, most likely creating problems in fit and performance.

To truly evaluate the fit of a skate boot, relax and spend some time in it. In 10 to 15 minutes, the boot will warm up on your foot and feel quite different than when you first put it on. The way it feels after it warms up is the way it will feel when you're skating in it.

Getting a good fit takes time. When you buy skates, plan on spending some quality time in the store. It can take as much as an hour to fit you properly.

The World's Oldest Known Skating Image

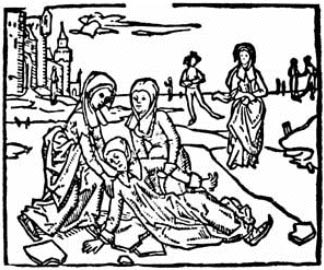
In 1396 Lydwine (also Ludwina and Lidwina), a beautiful 16-year-old girl, from Schiedam in Holland was visited by friends, who invited her to go skating. Legend says that Lydwine's friends insisted that she go skating even though she said she wasn't feeling well. Once they were on the ice Lydwine was knocked down. She broke 6 ribs and was bedridden for the rest of her life. After the accident Lydwine had visions and was given credit for performing many miracles. Lydwine was canonized in 1890 and was named the Patron Saint of Skating in 1944. The Dutch artist, Johannes Brugman, made this image of the fateful fall in 1498. This image provided courtesy of the SchaatsMuseum (Netherlands)

Skating History & Facts

The oldest pair of skates known date back to about 3000 B.C., found at the bottom of a lake in Switzerland. The skates were made from the leg bones of large animals, holes were bored at each end of the bone and leather straps were used to tie the skates on. The Dutch word for "skate" is "schenkel" which means "leg bone".

Around the 14th Century, the Dutch started using wooden platform skates with flat iron bottom runners. The skates were attached to the skater's shoes with leather straps. Poles were used to propel the skater. Around 1500, the Dutch added a narrow metal double-edged blade, making the poles a thing of the past, as the skater could now push and glide with his feet (called the "Dutch Roll").

In 1848, E. V. Bushnell of Philadelphia, PA invented the first all steel clamp for skates.

In 1865, Jackson Haines, a famous American skater, developed the two plate all metal blade. The blade was attached directly to Haines' boots. The skater became famous for his new dance moves, jumps and spins. Haines added the first toe pick to skates in the 1870's, making toe pick jumps possible.

The first artificial ice rink (mechanically-refrigerated) was built in 1876, at Chelsea, London, England and was named the Glaciarium. It was built near the King's Road in London by John Gamgee.

In 1914, John E. Strauss, a blade maker from St. Paul, Minnesota, invented the first closed toe blade made from one piece of steel, making skates lighter and stronger.

The largest outdoor ice rink is the Fujikyu Highland Promenade Rink in Japan, built in 1967 and boasts an ice area of 165,750 square feet-- equal to 3.8 acres.

Monday, May 29, 2006

Weekly Drill


Click on image for larger view


Weekly Drill: Race for the puck. Players in pairs skate hard from blueline to redline, back to blueline and then race to puck and shoot on net. Player without puck backchecks. Run from both sides. Always stop facing into rink.


This drill is great for conditioning but should only be run for a short time. I usually have players go through the drill 4 or 5 times and then give them a water break,

Puck Shooting Skills

The development of hockey shooting skills consists of learning and mastering the techniques, developing accuracy, consistency and power and mastering shooting from different angles and positions.

To become a great shooter, a player needs to practice two to three hundreds shots a week of all the different types of hockey shots (wrist shot, backhand shot, snap shot and slap shot), and will benefit their passing and stick handling. This combination of off-ice and on-ice shooting practice will develop good shooting skills.

All sports are the same; the best players spend hours and hours every week on developing their skills. Hockey is one of the sports where players practice their shots the least. The reason is simple: while on the ice, players spend little time on shooting. Every serious hockey player from the beginner to the junior levels needs to practice hockey shooting off the ice.

Remember that shooting skills are difficult to master and require a lot of time and effort.

Have fun while you learn new shooting skills and become a better player!

Stats!

How often do you watch a hockey game and think about the statistics being compiled by the coaching staff — probably not very often. And I’m not just referring to “shots on goal” or “saves.” There are any number of stats being created during a typical game, particularly in today’s NHL.

Facing the Competition

It is also important to note who the competition is when considering or compiling worthwhile statistics. For example, in a play-off series with Edmonton, their defense was extremely effective in blocking shots against the Kings. Noting the player (by number) who was doing the blocking, and where he was on the ice when the block occurred, became a valuable piece of information (stat) for the Kings coaching staff.

It’s very common to chart shots using the triangle-shaped, high-percentage zone as the key. Shots taken from within this zone are charted as important factors in a game, regardless of whether the shots were in the offensive or defensive zone.

Importance of Turnovers

Turnovers by your team are also very important to follow through the course of any game. There are patterns that develop by charting these stats. These patterns tell a coaching staff how to react to problems that occurs as a result of these stats (in this instance, turnovers.) If a player’s number keeps coming up who is involved in turnovers that result in out-numbered attacks, or goals against, that player is going to be looked upon as a potential liability. More specifically, there are certain areas (grey zones) that coaches forbid the puck to lost in. These areas are just inside the blue line, four to five feet on either side when defending, or just outside the second blue line when attacking through the neutral zone.

Specific Reasons

The reasons these are considered critical turnover areas are:

If the puck is lost as you attempt to clear your own zone, the opposition has already gained entry, and if your teammates are in the break-out process, you’ll most likely find yourself in an out-numbered attack situation. A high-risk scoring opportunity is thus created for the opposing team.

Moving through the neutral zone, on the other hand, as you approach the second blue line on the attack, attempting to gain entry of the offensive zone presents a similar situation.

Loss of possession four to five feet before entering the final zone, not only stalls the attack, but again, the forwards are now caught up the ice, and the opposition is in a position to outnumber your defense in the transition.

Very simply stated, the puck “must come out” when approaching your own blue line, and the puck “must go in” when approaching the opposition’s blue line.

Some Other Stats

Other statistics not often considered are: goaltender tendencies, regular puck movements, hits, face-offs and others. Sometimes specific players are tracked: centers, wings, defensemen and even goalies.It’s also common when looking for stats, for a coach to segment the game. Each period's stats are analyzed to determine what is important for the next segment or period. Shifts are sometimes altered, match-ups are changed, length of shifts become an issue, etc.

All of the above is very helpful to the coaches to identify areas need a little more attention as they develop.

Power Skating

Power Skating

For any player, at any level, to improve your skating, you must constantly work and concentrate on repeating the proper techniques. However, one of the great problems in practicing your skating is quite often not your lack of effort but rather your lack of understanding or knowing whether you are practicing proper techniques or, simply, entrenching your bad habits even more.

To quote Jack Blatherwick in his book Overspeed, "Practice does not make perfect, it only makes permanent." For these reasons, when we teach skating to any age or level we try to steer away from the technical jargon and instead try to get you to focus on what I call "skating imagery." It makes teaching and learning much more fun and, more importantly, makes retaining the information much easier. For example, we are constantly being reminded by skating instructors or television commentators about Paul Coffey's 90-degree knee bend or about the full extension of his skate, and both of these observations are 100% correct. But for us mere mortals who would like to emulate Coffey's speed and style (and who wouldn't?), how do we know if we are achieving the 90-degree knee bend or full extension; and for that matter, what do these terms even mean? What follows are some helpful hints, examples of skating imagery and practice driIls, which can be applied both on the ice as well as off the ice using your in-line skates. These hints will allow you to draw pictures in your mind, making it simpler for you to work on the proper skating techniques on your own.

Knee Bend

Helpful Hints: This much is AUTOMATIC, the more you bend your knees -- whether you are skating forwards, backwards or turning -the better your control, balance, speed and power. However, knowing that you should bend your knees more is one thing, DOING IT is another story. Therefore, you must make a great effort to exaggerate the bending of your knees while practicing your skating. Bend the knees lower then what feels comfortable for you, or lower than where you usually skate. In fact, I challenge you to bend your knees too far.

Skating Imagery: As I just discussed, a 90-degree angle of the knee is the optimal knee bend position. However, since it is impossible to play hockey with a measuring stick in your hand, simply bend your knees to a point where you cannot see the toes of your skates. With knee pads on, this means that the knee Is about two inches ahead of your gliding skate and that will ensure that you are at least at a 90-degree angle.

Practice Drill: One excellent practice exercise is called the One-Leg Push. In this drill we are practicing by first using only our right leg to push off from while skating on one side of the ice, and then with only our left on the other side. Concentrate on maintaining your gliding knee at about two inches ahead (90 degrees) of your toes while fully extending the pushing leg. Each push comes from an inside edge digging squarely into the ice (see the next paragraph). You will want to put 100% effort into each thrust to get the most benefit from this drill.

Edge Control

Helpful Hints: As we have discussed, bending your knees is a must for better skating. However, it is just as vital that you bend your ankles as well. What I mean by "bending your ankles" is that you want to have excellent flexibility in the ankles so that you are able to roll the skate to the proper and optimum edge position. The best angle for an edge -- inside or outside edge -- in relation to the ice is 45 degrees. At 45 degrees, you will feel an excellent grip in the ice which will immediately improve your balance, control, speed and power in all aspects of hockey skating. Of course, maintaining an edge at 45 degrees is very difficult and we see many high level players who still have trouble using their edges properly.

Skating Imagery: Once again, describing in detail how your edge should be 45 degrees to the ice may not mean that much to you (especially if you did as poorly in Geometry as I did). Therefore, concentrate on rolling your ankle HALFWAY to the ice; this will automatically put you at the necessary and best angle. Try to picture in your mind that your edges are your grip in the ice, and when your grip is improper, you are sliding along the ice -- losing power and speed -- rather than driving into it. Also, in order to hold an inside or outside edge in the ice, be sure that you have ALL of your body weight centered directly over it.

Practice Drill: An exercise which is super for all levels, from NHL and National Team players to beginning skaters, is the One-Foot Edge Glide. This drill can be worked on at all times - in game warm-ups or in practice. In this exercise you will use one foot gliding on an edge that is half way to the ice (45 degrees) while the other foot is off the ice and held closely to the skating foot. Your goal is to be able to hold your balance on one foot remaining on that edge long enough to form a big half circle in the ice before you push off and duplicate this procedure with the other foot. Remember to maintain a deep knee bend and 100% body weight, and try to keep a good, even pace when practicing this drill. This exercise should be practiced on inside and outside edges as well as both forwards and backwards.

It Doesn't Come Overnight

I'm sure we all wish that we could simply wave a magic wand that would allow us to suddenly skate like Coffey or Pavel Bure. Unfortunately, we know that this is not going to happen, and in fact, there is no magic relating to Coffey or Bure's skating skills either. Their greatness comes from working hard and understanding the proper skating techniques and fundamentals. And you too can definitely make great improvements in your skating if you begin to put these fundamentals to work by visualizing and feeling what you are doing, both correctly and incorrectly. Finally, remember that you can get better at any age or skill level. So try not to get frustrated when practicing your skating. Sometimes the strides you make can be very subtle and may take a long time to achieve, but they are worth it in the long run -when you skate better, the game is much easier to play and certainly much more fun.