Friday, May 19, 2006

Questions???


Hopefully, this answers some of your questions.

Over the years, the same few questions keep popping up and I thought I’d answer some of the most frequently asked ones here.

Only a few are listed here, so look for more to come in the following articles.

Everyone has their own hockey philosophies and I am no different. However, the responses that follow are the result of questions and ideas that I have pondered and experimented with throughout my coaching career, a compilation of information and experiences

1. How often should I eat before a practice? An off ice work out? A big Game?

The rule of thumb is about 3 hours prior to the event. Many players like to play "hungry" but frequently replenish themselves throughout competition with simple carbohydrates such as Gatorade or PowerAde, which are immediately available to the body as quick energy. Eating too close to game-time can make you sluggish and even cause cramping, nausea and even vomiting. Just what you don’t want to put your body through in the heat of battle. Proper digestion is key to utilizing the nutrients and energy that food provides us.

2. What types of food should I eat before lacing up the skates?

Any time you ask your mind and your body to perform at a high level, they need ultra-octane fuel. Like a high-performance race car, a hockey player requires top notch fuel. In fact, your body is much more complex than any race car. On the ice, are you driving an ‘82 Pinto or a ‘99 Ferrari? A pre-game meal that is high in complex carbohydrates (pasta, potatoes, rice), contains moderate protein levels (fish, chicken) is a good formula. Be disciplined when it comes to high fat foods, foods containing poor fuel, especially prior to a game or workout (french fries, burgers, hot dogs, chips, fast food, deep fried foods, deserts).

If the high-octane fuel never gets to your engine, what’s the point? Stay away from the big T-bone steak and sides of beef as they tend to be much more difficult for your body to breakdown and digest in a short period. Allow 3-4 hours for complete digestion and avoid high fat foods. Lastly, drink plenty of fluids. This too will aid in digestion. Several glasses of water 1-2 hours before competition and frequent re-hydration during competition helps control your body temperature (sweating) and aides in digestion, energy utilization and helps control lactic acid buildup (heavy legs).

3. How often should I sharpen my skates? How do I know when it is time?

I run into this question possibly more than any other. The simple answer is, don’t sharpen your skates as often as you do. Most people are infatuated with sharp skates and grind the expensive steel from their $300-$400 skates much too frequently. Sure, skates need to be sharp, but they never need to be razor sharp. In fact, skates that are too sharp are much more likely to cause knee and ankle injuries and because of excess friction, will decrease your speed, agility and overall performance on the ice.

The function of your blade is to furnish two distinct edges, an inside edge and an outside edge. And the function of your edges is to grip the ice. There are two ways to grip the ice. One is with very sharp skates. Extra sharp skates automatically cut deeply into the ice providing too much grip and not enough "play" or "slide" which is needed when stopping and changing directions. The other way, and the best way to create grip, is to roll your ankles which digs an edge into the ice, allowing you to control the amount and degree of grip. You are now in control, not your skate. Your edges should provide a certain degree of slide, or play (this is called the flat of your skate). A skate that is too sharp does not provide ‘play’ and holds you to the direction of your momentum (similar to a heavy train trying to turn or stop).

On a scale of 1-10 (10 being extra sharp), most people maintain a 9 or 10. I recommend a 7-8. This lets your skates have more movement, but the trick now is to learn how to control your edges through precise angles and pressure. I say that the average player can easily skate 25-30 hours, unless you "lose an edge" (this number of hours may decrease if you are a player who covers more ice per hour or if you are a skilled player who uses their edges extensively). Get into the habit of lightly rubbing your finger along both edges at once. Most high-level players use this test before each ice session to give them the confidence that their edges are faithfully beneath them ready for duty. If when you rub your finger along your blade, you feel a ‘bur’ or a ‘knick’, or the blade is not completely smooth, consider getting them sharpened. Just remember that sharp skates are important, but not as important as blades that are smooth and ‘knick-free’.

The sharpness is definitely important, but even more so is the "hollow" or deepness of the edges. Some sharpening machines grind a deep hollow, which is bad news! Stay away from a deep hollow that will create the "death grip" to the ice and eliminate all ‘play’ (ability to slide when needed). To measure the hollow on your skate blade, turn the boot upside down holding the heal towards your body, with the toe facing away. Like looking through the sights of a gun, close one eye and look down the blade while holding it up to a light. Now place a penny on the blade and measure how much light shows under the coin. More than a slight sliver is too much, and therefore, too much hollow. As you run your finger along the blade, you should feel only a very slight ‘U-shaped groove’ in the blade.

Running your finger along the blade and flipping the boot upside down and looking at the light showing under a coin are the only tests that many top level players use to assure proper edge condition. In fact many players actually "take the edge off the edge". This means, they try to take some of the sharpness and hollow off of their edges by rubbing them several times along a piece of wood or another dulling device. If you are among those who race to the sharpening machine twice a week, you more than likely are not only throwing away money, placing yourself at risk of injury, but are actually decreasing your speed and agility on the ice.

PREPARING YOURSELF FOR THE PERFECT GAME

After your favorite pre-game meal (lots of carbohydrates) and a bit of a rest (for digestion time), it’s off to the rink. Once you step into the rink, your preparation should continue through the end of the game and beyond.

What are some ways I can use locker-room time to energize me for a great performance?

I am a firm believer of being active during the game, on the ice and off. If for no other reason, your energy often times feeds your teammates, energy and positive "vibes" tend to be contagious. However, prior to the game, on the way to the rink and in the locker-room, I recommend a more "to yourself" approach. This will give you the opportunity to make sure that you prepare yourself properly and that "all systems are GO".

Pre-game Checklist

Pre-game preparation is a time to make sure everything is in tip top shape and ready for battle. Not only yourself, but your gear, skates and stick. Take care of the entire solder, armor and all and the battle will be easily won. Make sure your skates are properly sharpened with distinct edges and are free of "knicks", make sure your stick is taped the way you like it and double check that all your gear fits correctly. If you are planning to play with an injury (which becomes more prominent with each jump in age level) address it properly.

I will save hockey superstitions for a later article, however, many players make sure the left skate goes on before the right one, and believe it or not, some players even sleep with their game stick the night before. Also, visualization is becoming quite popular, something you may want to try. An interesting side-note to illustrate the prevalence of pre-game routines: If you pulled the fire alarm in an NHL locker-room before a game, no one would flinch. To get their "game faces" on, almost every ear is plugged into listening to music, everything from Classical to Heavy Metal. If it works, use it!

It all boils down to taking care of what is going to take care of you. You don’t want to lose an edge when racing into the corner for a puck, you don’t want your stick to give out on you during a breakaway and you want all of your padding to be in place when you take a hit. Lastly, don’t forget to prepare your body with plenty of warm-ups and stretching (I recommend jumping rope for 10 minutes to warm up your muscles before you stretch. Try freezing a rubber band and then stretching it. Don’t stretch cold!).
There is no right or wrong pre-game approach. However, more than half of all hockey injuries are caused by poor flexibility. In other words, you can cut your chances of injury in half by adequately warming up and stretching prior to each ice session.

What can I do between shifts to make sure I am prepared for the upcoming shift?

Think for a moment about what you do between shifts. Chances are you don’t know and this could be taking away from your speed, stickhandling and overall contribution to your team. Most coaches help you develop your skills and work on plays such as breakouts so that you know your responsibilities on the ice. However, the biggest responsibility you have as a player, both to yourself and your team, is to make sure that you are prepared each time you take the ice. You become a performer on stage and the spot-light is on YOU. What are you going to do? Steal the show, or turn in a so-so performance. The key is to rebound your mind and body from a demanding and exhausting prior shift....in a hurry.

Fatigue is the number one cause of mistakes on the ice. Fatigue causes mental break-downs and when thoughts aren’t clear, you make poor decisions. Since it is impossible to completely eliminate fatigue and its negative effects, your goal should be to POSTPONE fatigue. Controlling fatigue comes primarily from off ice training & conditioning and from a strong work ethic in practice. However, most people don’t realize how easy it is to make fatigue in the shape of "tired legs" and exhaustion go away in just a minute or two, while we are awaiting our next shift.

Martial arts place a big emphasis on breathing and becoming in tuned with your body, and many competitive hockey players do the same. Try taking 10-15 deep breaths as soon as you get off the ice and even during a shift. As you do this, move around a bit. While on the bench, move your legs and shrug your shoulders. Try this standing up. When an airplane pulls into the gate, the captain doesn’t turn its engines off, nor should we. Stay active on the bench, both internally and externally. Keep your muscles warm by moving around and stay vocal offering positive team comments.

Give it all you have during the game and kick your feet up after the game, not between shifts. Lastly, drink plenty of fluids before, during and after each ice session. A hockey player demands a great deal from his/her body. In fact, you are asking your body to do things it is not made to do, and that it can not do naturally and freely without training! Preparing yourself AND keeping yourself "tuned up" throughout the ice session is critical to performing at your highest possible level.

Thursday, May 18, 2006

Weekly Drill.


Click on image for larger view


Weekly Drill: Player 1 skate across ice and turn up towards player 2 in far group. Player 2 passes to player 1 who then makes quick touch pass back to player 2. Player 1 then transitions with pivot (keeping eyes on player with puck at all times) and sprints towards far net. Player hits player 1 with pass making sure to lead player 1 with the pass. Player 1 then skates in on goalie, head up picking spot, shoots and stops for rebound. Alternate from both sides. This drill teaches passing, skating pivots and acceleration, shooting and is good for conditioning if run at top speed.

Once the skill progresses, the addition of a defencemen for one on one drills takes this drill to the next level.

Wednesday, May 17, 2006

Ready Position for the Goalie


Getting a good, steady ready position is the first thing goalies should learn how to do. Since during a game goalies are almost always in the ready position, it's important to get it right the first time, and not to get any bad habits.

In the ready position, your knees should be bent at all times. This helps you move faster and react faster to quick shots. Your catching glove should be open and out in front of you a little. The only time your that glove should be closed is when the puck is in it! Your blocker should aslo be held out infront of your knees. It's best that both your gloves are held at the same height.

Your stick should always be on the ice. It's really important to get this right: Stick on the ice at all times! Even when moving from side-to-side or post-to-post, keep your stick on the ice. The puck might hit a stick or skate and deflect right at you and it will probably be on the ice (where your stick should be!!). Your stick should not be touching the toes of your skates. If your stick is against the toes of your skates, and a puck hits your stick, you will give out a really big rebound (usually right out in front) and you will have less control of where it goes. Your stick should be placed at a small angle and far enough in front of your feet so it doesn't touch your toes. You should always keep your head up when in the ready position.

Your legs should be independant from your arms. When you move your legs, your arms don't move with them. You should be ready to move in any direction at any time. You should be comfortable when in your ready position. Try not to lean to far forwards, or backwards. Get a nice balanced position. Your weight should be on the balls of your feet. And above all else, relax! Don't think, react!

The Most Important Skill in Hockey


Skating is the most important skill in hockey and that is why players spend numerous hours trying to improve their skating abilities. No matter what level a player attains, he can always improve his skating skills. You will often see advanced hockey players (college, professional) seek advice on how to improve their speed, explosiveness and technique.

Learning how to skate is very difficult and requires a lot of dedication and hard work. Focus on one specific area at a time, and apply one tip at a time. Equally important to technical skills are improving leg strength, endurance and flexibility. A good off-ice-training program is essential to increase your speed, explosiveness and endurance, and reduce your risk of injuries.

Each week, I'll update this section with a skating tip starting with Forward Skating this week.

FORWARD SKATING

The forward skating motion should be your first priority when learning how to skate. Although it may look easy, skating in a forward motion is very difficult and requires a lot of time and practice. Learning to skate with a proper technique will make you improve a lot faster and give you the confidence to develop into a great skater in the future.

Proper Technique

• Start with your skates forming a ‘’V’’, knees turned outwards
• Bend your knees (you should not be able to see your toes)
• Push one foot at a time and transfer all your body weight into each stride
• Reach a full extension on each stride with your driving leg and with your ankle
• When you fully extend one leg, rapidly return the leg back to the ‘’V’’ position and extend the other leg
• As you get more comfortable, work on extending faster (you will gain more speed)
Tips
• When skating forward, your feet should always be hip width apart
• Your body is always square to the direction of travel
• Your back should be straight, your head in the centre of your shoulders with eyes focusing forward
• Don’t lean your body to far forward (use the body lean that gives you maximum balance and lets you to take fully extended strides)
• Make sure to always bend your knees (beyond level of comfort) A good knee bend equals more power and more balance
• Skate one foot at a time
• Fully extend on each stride with a quick recovery
• As you become a better skater, focus on taking wider strides for more speed
• Skate with a proper arm swinging movement (arm and leg movements work in rhythm with their opposites)
• Always keep your stick on the ice, except when you are looking to gain top speed

Angles of Checking

Angles of Checking

This discussion will talk about how it helps you check an opposing player in the following game situations: angles of checking in the corner, defending a "D" to "D" pass in the neutral zone, and attacking a "D" on your defensive blue line.

Checking in the Corner

Whether you are a "D" defending a "F" in the defensive zone or a "F" attacking a "D" in the offensive zone the angles are the same. The normal tendency of most players is to react to the puck going into the corner by skating as fast as they can straight at the player and the puck. The problem with this is that the opposing player has an equal chance of going making a move on you to the left or the right. The attacking player would have to guess or react at the last moment when the opposing player makes their move. This often leads to poor results.
Before you attack or defend the player in the corner, you need to know where you want them to go. You also need to know where your support is and where the less dangerous area of ice is located. Let us say that you want the opposing player to go up the boards, because your wing is there to support. Your first motion towards the opposing player is toward the side of the net you are defending. This will give the impression that the boards are open. Most likely, they will skate up the boards, and you can angle them off without worrying if they cut back toward the net. If they do cut back, they turn back into you. In other words, you have taken control of their options and forced them to go and do what you want them to do.

Defending a "D" to "D" Neutral Zone Regroup Pass

The new rule for offsides has changed the game considerably. Players are now forced to bring the puck back into center ice or the "Neutral Zone" as it is called. The "D" on the opposing team will try to do a "D" to "D" pass giving his/her forwards more time to get out of the offensive zone and come back to support.
Most of the time, players will go straight at the first "D" who has the puck and allow them to make that "D" to "D" pass. Actually, what you want to do is go right down the middle. Your first thought may be that this is crazy. Why not attack the "D", and why allow them to skate with the puck along the boards? It is quite simple. Just remember why they are trying to make the pass in the first place: to buy more time. You want to control them and the play. By going through the middle and then at the "D", you have isolated or blocked off the "D" with the puck. This may make them force a bad pass, an offside, or an icing. At worst the "D" may dump or skate the puck up the strong side of the ice where there is support from your teammates. In other words, you have controlled their options, their time, and the play.

Attacking a "D" on Your Defensive Blue Line

This is very similar to defending a "D" to "D" pass in the neutral zone. However, the reason is slightly different for angling your check from the middle of the two "D" in toward the boards. You will also have a slightly different angle of approach. Attack the "D" by skating in his line of fire. Meaning, if you drew a line from the puck to the net, that would be the line of fire. You need to start by skating as fast as you can to that line and then attack the "D" taking away the shot. As you get close to the "D", you angle from the middle of the two "D" in towards the boards taking the other options away. For example, if you were the right wing attacking the opposing left "D" whom has the puck on your defensive zone blue line along the boards; you would create at least three bad situations to go straight at him/her. First, you give them the opportunity to get a quick shot on net. Second, you give them the opportunity to pass the puck across the center of the zone or the "Slot", as it is called, to a player in a better position to shoot. Finally, you would be giving them the opportunity to pass "D" to "D" across the blue line to the "D" in a more dangerous position to shoot or pass the puck. By going up the middle and back at the "D" toward the boards, you take all of these options away. The "D" would have to shoot or pass the puck through you or traffic making it a difficult play. In most cases the "D" will end up hitting you with the shot or pass, or he/she will just make the safe play and throw the puck back into the corner. In other words, you have again controlled the options and the play of the opposing team forcing them to make a safer play or possibly turning the puck back over to your team.

Hint: Always use your stick to help angle the player in the direction you want them to go. It will also help you take away more of a passing lane by putting your stick in the open area that your body can not and does not cover.

Good Gap Control, Tips From the Stars Brian Leetch

TIPS from the STARS
With Brian Leetch
Toronto Maple Leafs

GOOD GAP CONTROL LET’S YOU DICTATE THE PLAY

Scoring chances are born out of the amount of time and space given to the team with the puck. Your job as a defender is to limit that time and space, forcing your opponent to give up the puck and put your team on the offensive. That’s why gap control is an important part of the game.
A gap is the amount of space between the puck carrier and the defensive player. Win the battle of the gaps, and you will likely win the hockey game.

TIP #1

By playing a tight gap a defenseman is taking away time and space from his opponent. Doing so will allow the defenseman to dictate where he wants the offensive player to go, which is generally toward the outside of the rink and away from a prime scoring area.

TIP #2

Too often a defenseman will play a loose gap out of respect for an opponent’s speed and skill, and for fear of getting beat. If that’s the case, the offensive player is generally going to take the middle of the ice and have a better angle to shoot on net. You may not get beat physically, but your opponent is going to get a good scoring opportunity.

TIP #3

It’s important to know whether your opponent is a left-handed or right-handed shot, and if he is playing the off-wing or his strong side. If the puck carrier is on his strong side, you may be able to give a little more of a gap because he has to expose the puck by bringing it in front of you as he cuts toward the middle of the ice, which may allow you the opportunity to poke the puck away.

Tip #4

If the forward is on his off-wing and you play too loose a gap, he can cut to the middle of the ice while protecting the puck with his body. That’s why you need to play a tighter gap in these situations.

Tip #5

Always remember to play the body, not the puck. As the puck carrier is skating toward you, watch his chest and play stick on stick to contest the shot or pass.

REMEMBER THIS …

It’s important to work on maintaining tight gaps, especially in practice and in early-season games. Don’t be afraid of getting beat. You want to dictate the play, not your opposition.

Passing With a Purpose

Once players have begun to develop the skills of passing and receiving the puck, they need to begin to figure out just when, and more importantly, why, to utilize those skills. Hockey is not like football with designed plays beginning from a standstill, or even basketball for that matter, where the ball movement and player movement is slower and more designed plays can be used. In hockey, virtually every situation that a player is confronted with on the ice is different as there are players in a variety of different spots on the ice, moving at a variety of different speeds. When controlling the puck, a player needs to be able to assess the situation and make the best available play, whether it is passing the puck to a teammate, or keeping it himself to move it up the ice.

That’s not to say, that there shouldn’t be a “basic team structure” or “system” for controlling the puck, with players in the properly designated positions on the ice (in any of the zones) when their teammate has the puck. But what can’t happen is that the players feel they “have” to pass the puck to a specific teammate in a specific situation. That can’t happen, because they will never learn how to read the play and make the best play available. That is something that every player needs to learn to be able to compete effectively as they progress in the game.

Every pass should have a purpose. If it doesn’t, it shouldn’t be made. Teams, and individual players work very hard to gain control of the puck. Once they get it, every effort should be made to maintain it. So every pass should be made with that in mind, team puck control. The following are key points to instill in your players for better team puck control.

Make the Easy Play

Great players make the game look easy. That’s because they make the easy play. Going for the “home run” more often that not results in a turnover, when the intended result could be achieved with “a couple of singles”. Trying to pass through a defender or trying to connect on a sixty-foot pass, is not the right play, when you can make a 15-footer to a teammate with more time and space to make a play once they get the puck.

Make Quality Passes

It goes without saying that every pass should be on the stick. If a pass is not made “tape to tape”, that split-second it takes for the teammate to collect it and start to move with it is all of the time it takes for a defender to close in on him and take it away. Just as important as accuracy is velocity. Different situations dictate different passes, but in most instances where a direct pass can be made, the puck should be passed crisply and on the ice. Bouncing, wobbly, slow passes allow the defenders more time to adjust and pursue the puck. Crisp, accurate passes catch defenders out of position and don’t allow them time to get back into the play. Many players recognize the correct situation to make a pass, but if they don’t deliver the pass with authority, it doesn’t matter that they made the right choice.

Move the Puck Quickly

Recognizing which teammates are “open” and “where to move the puck” are essential skills in team puck control. More importantly, players need to be taught to recognize “when” to move it, and the answer is IMMEDIATELY. By waiting just a split second longer, that pass will probably no longer be an option, especially if it is a “long “ pass.

Short Passes are the Best Passes

Occasionally, you can catch 3-4 opposing players out of position and beat them all with one good, long pass. Short passes, 10 to 15 footers, are always the best passes for a couple of reasons. First, they have a greater chance of success. It is much easier to hit your teammate’s stick from 10 feet than it is from 50 feet. Secondly, the puck receiver will most likely have more time to make a play with it when he gets it. As a long pass makes its way to its target, so do the opposing players, as they have more time to adjust. Often, just as the puck arrives, so do the defenders, and the pass is never completed.

Create Something out of Nothing

If a puck carrier has no time or space to make a play, and is being confronted by a defender, the best thing to do, rather than try to beat the defender 1 on 1, is to move the puck to an open teammate, then get open. By moving the puck to a teammate, the player shifts the focus away from himself, which is only an advantage if he moves quickly to an open area to receive a pass back. The “give and go” is an essential part of team puck control and can be used anywhere on the ice. But it is only effective if the initial passer actually “goes” to open ice after making the pass, and breaks down if the payer “gives and watches”.

Use the “Extra Teammate”

Using the boards to make a pass to himself is the most basic “give and go” play a player can make. Moving the puck off the boards (or ff of the back of the goal net), then skating around the defender to pick it up is an effective move to create something out of nothing. The boards can also be used to “bank a pass” or “rim a pass” along the dasher boards in the corners, when there is not a direct pass available to a teammate.

Basic Stickhandling Off Ice Exercises


Stick Handling

The Facts

Stick handling is one of the most important fundamental skills in hockey. You need good stick handling skills to play heads up hockey, to take and maintain possession of the puck, to win face-offs, to receive and make passes and to shoot the puck.

All the great puck carriers, great passers and great shooters can stick handle, position and shoot or pass the puck with their head up; this requires a lot of focused repetitive training. Because stick handling is such an integral part of hockey, stick handling should be one of the first things that a player learns and practices.

Hockey players can practice stick handling both on and off the ice. The important thing, especially for young players, is simply to have a stick in their hands and play with a puck. Street hockey games are a great way to develop stick handling skills but a player should also practice stick handling alone to focus on his technique and to learn new skills.

Stick handling can be practiced off the ice in your basement, garage or in your driveway. You can use a ball (tennis, golf or roller hockey) but a puck provides a better simulation. The more the puck and stick slide on the surface, the better it is for stick handling.

Learning Stick Handling

First, stick handle with your eyes fixed on the puck. Move the puck within a 12 to 18 inch span using a back and forth soft sweeping motion. Develop a comfortable rhythm, do not over handle the puck There should be very little impact and almost no sound.

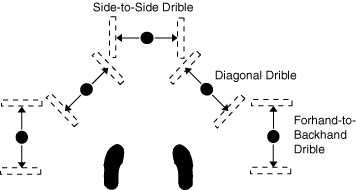
Practice side-to-side dribble, forward-to-backward dribble and diagonal dribbling. Master stick handling in a stationary position and then practice stick handling while moving forward, sideways and backwards.

Improving Stick Handling

Gradually take your eyes off the puck and fix them on your target or simply stick handle with your eyes closed. Master stick handling in a stationary position and then practice stick handling while moving forward, sideways and backwards. Develop a feel for the position of the dribbled puck. Stick handle the puck close to your feet and with full arm extension. Practice all the stick handling drills taught by your coach on the ice such as the forehand shift, the backhand shift and puck protection.

Set up cones (use 2 liter pop plastic bottles half filled with water) and stick handle through them. Try not to look at the puck and keep count of the number of times you can stick handle through the cones without losing control of the puck. As you make the move around the cones, practice the fake motion for deeking players.